PWS3D Battle Bypass
PWS3D Battle Bypass • V1

Try it free. Upgrade when you're ready.

Flash the free PWS3D RPM Meter with no account or activation, or unlock Battle Bypass V1 for training, launch history, Beygotchi, local Duel Mode, and supported app connectivity.

RPM MeterTraining + HistoryBeygotchiDuel ModeApp / BLE Mode
Free Edition

PWS3D RPM Meter — Free

Basic RPM tracking only. No account, payment, license key, or activation credit required.

$0 • Unlimited reflashes
Basic RPM trackingESP32-S3No account required
FREE
Detected deviceNot connected— Connect an ESP32-S3 to try the free RPM meter.
Idle0%
This installs the free RPM-only firmware. You can upgrade the same ESP32 to Battle Bypass V1 later.
Free flasher technical log
PWS3D Free RPM flasher ready.
Free vs Full

Choose the version that fits you

Start with RPM tracking, then upgrade the same hardware anytime.

FeatureFree RPM MeterBattle Bypass V1
RPM trackingIncludedIncluded
Basic launch readingIncludedIncluded
Launch history—Included
Training mode—Included
Beygotchi—Included
Duel mode—Included
BX-09 / supported app features—Included
Blader profile / persistent stats—Included
Full Version

Unlock Battle Bypass V1

Every paid device activation is $10.

A free PWS3D account is required before checkout. Your purchases, license keys, remaining credits, and activated devices stay saved to your account so you can return later from any browser.

Paid Version

Choose your Battle Bypass license

Sign in to automatically load licenses saved to your PWS3D account, or use a license key manually.

Use a license key manually

Use this if you have a separate PWS3D license key or are flashing from a different workstation.

No license selected yet.
Paid Version

Connect and flash Battle Bypass

Checking browser…
S3
Detected deviceNot connected— Check a license key, then connect an ESP32-S3.
Idle0%
A new physical ESP32 uses one activation credit. Reflashing the same activated ESP32 does not use another credit.
Technical log
PWS3D Battle Bypass flasher ready.
PWS3D Battle Bypass • V1

How to use your Battle Bypass.

One button does almost everything. Tap, double-tap, or hold BOOT to move through screens and control each feature.

Quick Controls

Learn these first

The BOOT button is the main control.

TAP

Screen action / move forward

On most screens, a tap moves to the next screen. On MAIN it toggles the leveler. HISTORY uses tap to move through pages or highlighted launches. SETUP uses tap to move the cursor.

DOUBLE TAP

Next screen

Quickly press BOOT twice to move to the next screen. In HISTORY target-pick mode, double-tap cancels the selection.

HOLD ~1 SEC

Secondary action

Release after a long press to use the current screen's secondary action. On normal screens this flips the display orientation. HISTORY, TRAINING, BX09, and SETUP have their own hold actions.

HOLD 7 SEC

Duel Mode

From the MAIN RPM screen, hold BOOT for 7 seconds to enter Duel Mode. Duel Mode must first be enabled in SETUP. Hold 7 seconds again to exit an active duel.

Screen order: RPM → Beygotchi → Leveler → History → Training → Stats → BX-09 → Setup.
Feature Guide

What each mode does

Quick access instructions for V1.

01

RPM Tracking

Measures and displays your launch RPM automatically.

How to accessTurn the unit on and stay on the MAIN / RPM screen. Launch normally and the sensor will capture accepted launches.
Tap BOOT on MAIN to show or hide the leveler panel.
02

BX-09 Emulation

Connects to the official Beyblade X app like a Battle Pass and can send live launch data.

How to accessNavigate to BX09 EMULATION. If the official app has never been paired, tap BOOT once to start registration. Keep the app's pairing screen open until pairing completes.
After pairingFrom BX09 OFF, tap once to start normal advertising, then open Practice / Training in the official app. The screen changes to WAITING FOR APP and then CONNECTED.
While BX09 is ON, long-press BOOT to turn it off. While OFF and already paired, long-press to explicitly re-pair the official app.
03

3rd-Party App Support

Works with compatible apps and RPM tools that connect to the BX-09-style BLE interface.

How to accessGo to BX09 EMULATION. If the unit is not paired to the official app yet, long-press while BX09 is OFF to start the normal BX09/Helper-style mode, then connect from the compatible app.
BX09 Mode and Duel Mode cannot run at the same time.
04

Launch History

Shows your recent accepted launches, including RPM and launcher information.

How to accessNavigate to HISTORY. Tap to move through pages of launches.
Set a training targetLong-press to enter target-pick mode, tap to highlight a launch, then long-press again to pin it as your Training target. Double-tap cancels.
History keeps up to 100 recent launches for the current session. All-time best, total launches, and XP are saved separately.
05

Blader Profile

Tracks your Blader Level, XP, best RPM, total launches, average RPM, and Duel win/loss record.

How to accessNavigate to the STATS screen to view your progression and battle record.
Set your nameGo to SETUP → BLADER NAME. Tap through characters/positions and use the hold action to confirm/save.
Accepted launches automatically earn XP. Stronger launches, rank tiers, streaks, and new records can add bonus XP.
06

Beygotchi Mode

Raise a virtual Bey companion using the launches you already make.

How to accessNavigate to the PET / Beygotchi screen. Tap moves through choices; hold and release confirms a selected action.
ProgressAccepted launches earn rewards and help your companion grow. Training activities and pet battles provide additional progression.
Your Beygotchi progression is separate from your normal Blader XP and launch records.
07

Training Mode

Practice against a saved launch target and track how consistently you can reproduce it.

How to accessFirst pin a launch from HISTORY. The device automatically opens the TRAINING screen after the target is pinned.
Reset trainingOn TRAINING, perform the hold action twice within the confirmation window to reset that target's training progress.
The pinned target can use RPM and available launch-angle data for comparison.
08

Duel Mode

Two Battle Bypass devices can find each other, compare local launches, and update each Blader's win/loss record.

Enable it firstGo to SETUP → DUEL MODE and turn it ON.
Start a duelReturn to the MAIN / RPM screen. Hold BOOT continuously for 7 seconds. The device enters Duel Mode and searches for another Battle Bypass in Duel Mode.
ExitHold BOOT for 7 seconds again while Duel Mode is active.
BX09 Mode must be OFF before entering Duel Mode. Duel results feed the W-L record shown on STATS.
Setup

Useful settings

BrightnessSETUP → BRIGHTNESS
Flip screenSETUP → SCREEN FLIP, or long-press on a normal screen and release before the 7-second Duel trigger.
Blader nameSETUP → BLADER NAME
Duel enableSETUP → DUEL MODE
Power offSETUP → POWER OFF → confirm
Reset scoresSETUP → RESET SCORES → confirm
Open Hardware Guide

Build the physical unit.

Source the parts, assemble the ESP32-S3 RPM meter, then return to the Flash tab to purchase a firmware activation and install the PWS3D software.

Software license is separate.Building the hardware does not include firmware activation. Each new ESP32-S3 still requires one PWS3D activation.
Bill of Materials

What you need

Core parts for the current PWS3D build.

01
Waveshare ESP32-S3 1.47" LCD board

Main controller, USB-C interface, 172×320 display, and onboard QMI8658 IMU.

Required option: choose the unsoldered, non-touch version.
Buy ESP32-S3 on AliExpress ↗
×1
03
3.7 V 180 mAh LiPo battery

Compact rechargeable battery for the handheld unit. Select the 180 mAh option if the listing offers multiple capacities, and verify connector polarity before connecting.

Buy battery on AliExpress ↗
×1
04
SS12D00G 4 mm slide switch

Physical power switch used in the current enclosure design.

×1
05
28 AWG hookup wire

For the short internal sensor and power-switch connections.

As needed
07
PWS3D enclosure CAD

The STEP model contains the current shell geometry for the display board, battery, slide switch, and optical sensor. Use it to print the shell or modify the enclosure for your own manufacturing process.

×1 set
Wiring

Electrical connections

Only documented connections are shown.

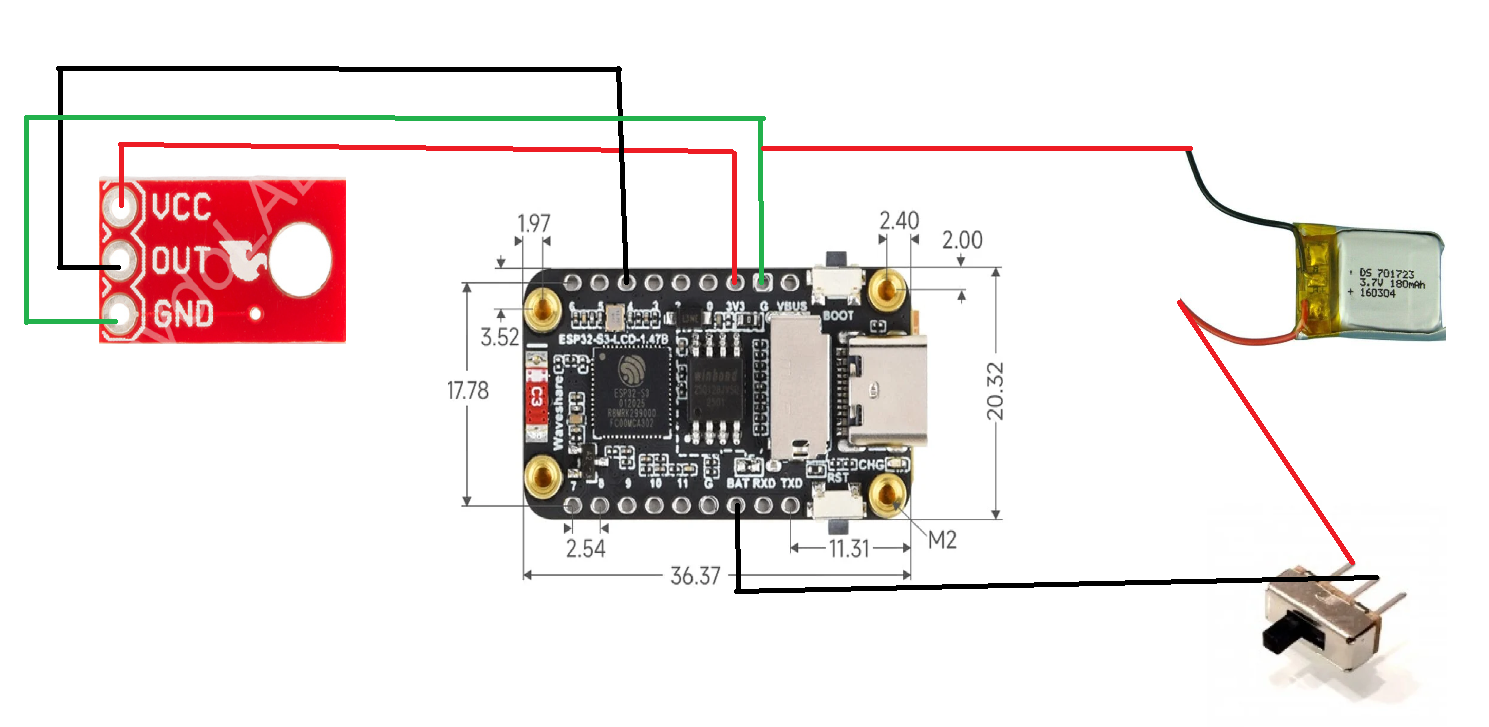
PWS3D physical unit wiring diagram showing the QRE1113 sensor, Waveshare ESP32-S3 1.47 inch board, 3.7 V 180 mAh LiPo battery, and SS12D00G slide switch wiring.
Reference wiring diagram for the current PWS3D physical build.
ComponentConnectionPurpose
QRE1113 OUTGPIO 4RPM pulse / reflectance input
BOOT buttonGPIO 0Built into the ESP32-S3 board; used for UI controls and upload mode
DisplayOnboardST7789 172×320 LCD; no external display wiring required
IMUOnboardQMI8658; firmware uses SDA GPIO48 / SCL GPIO47
LiPo + switchPower pathUse your board's battery connection and the enclosure's SS12D00G switch arrangement; verify polarity before power-up
Do not guess battery polarity. The firmware source confirms the signal GPIOs, but connector polarity depends on the exact board/battery lead. Verify + and − on the physical parts before connecting the LiPo.
Assembly

Build sequence

Recommended order for a clean first build.

1

Prepare the enclosure

Print the enclosure parts and test-fit the ESP32-S3 board, sensor, switch, battery, and three M2×8 fasteners before soldering.

2

Mount the RPM sensor

Position the QRE1113 so its reflective face points toward the launcher target surface. Keep the sensor placement consistent with the enclosure geometry.

3

Wire GPIO4

Connect the QRE1113 signal/output to GPIO4, then connect its power and ground to the appropriate board rails for your sensor module.

4

Install power hardware

Fit the 180 mAh LiPo and SS12D00G switch. Confirm battery polarity and that the switch cleanly disconnects the intended power path before closing the case.

5

Close and inspect

Route wires away from screw bosses and moving launcher surfaces, then secure the enclosure with the three M2×8 screws.

6

Flash the firmware

Connect USB-C and open the Flash tab in desktop Chrome or Edge. You can flash the free RPM Meter immediately, or purchase/enter a license to install Battle Bypass V1.

7

Turn the unit on

Move the physical slide switch to ON. On a cold power-up the screen may remain dark by design. Press and release the onboard BOOT button once to start the meter.

Power & Charging

How to turn on and charge the unit

Give these instructions to every customer.

Powering on

  1. Move the physical SS12D00G slide switch to ON.
  2. The display may stay dark after a cold power-up. This is normal for the current firmware.
  3. Press and release the BOOT button once to wake and start the meter.

The current firmware intentionally waits in a dark standby state after cold power-on until BOOT is pressed.

Powering off

  1. Use SETUP → POWER OFF on the device and hold to confirm.
  2. After the screen shuts down, move the physical slide switch to OFF for storage or transport.
First Power-On

Quick acceptance check